Status of Ansible remediations in SCAP Security Guide

Very quick intro into SSG

SCAP Security Guide (or SSG for short) is the open source project to check out if you are interested in security policies. They provide fully automated SCAP content for various products ranging from Red Hat Enterprise Linux 5, 6, 7 all the way to JRE, Webmin, … The security policies are organized into hierarchical benchmarks. Each benchmark has a set of rules and each rule has:

  • an automated check written in OVAL
  • security community identifiers – CCE, CVE, NIST 800-53, …
  • description, rationale, title, …
  • bash fix snippet that can be run to put the machine in compliance with that particular rule

You can check out examples of these rules for RHEL7 in the Red Hat Enterprise Linux 7 security guides. Check out our Getting Started page for how to get started with SCAP security policies.

TL;DR: Give me the playbooks!

Here they are! Generated from SCAP Security Guide content for Red Hat Enterprise Linux 7: ssg-rhel7-ansible-examples.zip

cd /tmp
mkdir ansible-ssg-test
cd ansible-ssg-test
wget https://martin.preisler.me/wp-content/uploads/2017/06/ssg-rhel7-ansible-examples.zip
unzip ssg-rhel7-ansible-examples.zip
cd ssg-rhel7-ansible-examples
# check mode first
sudo ansible-playbook --check ./ssg-rhel7-role-common.yml
# this will change configuration of localhost!
sudo ansible-playbook ./ssg-rhel7-role-common.yml

Fix scripts use-cases

It is possible to generate compliance bash scripts from any of the security policies and then run them on the machines to set them up. Recently we have added initial support for Ansible fixes. We envision that the user will be able to generate ansible playbooks in a similar way that they can generate bash remediation scripts today. We have two workflows in mind. Either the user scans the machine with OpenSCAP and then generates a “minimal” Ansible playbook from the results, this playbook will only contain fixes for rules that failed during evaluation. In the second use-case the user generates an Ansible playbook from the security policy. This playbook will contain fixes for all rules in that policy. Since the fixes are idempotent it is possible to apply the same playbook multiple times without detrimental effects to the configuration. We use the name “remediation roles” when we talk about remediation scripts for entire security policies.

Remediation role for results
Remediation role for the whole profile

Remediation roles in SSG

We have added automated remediation role generators to the SCAP Security Guide build system. Every time the SSG SCAP content is built it will build a remediation role for every profile in every benchmark. We plan to include these remediation roles in the release ZIP file.

Example of a bash remediation role:

# The two fingerprints below are retrieved from https://access.redhat.com/security/team/key
readonly REDHAT_RELEASE_2_FINGERPRINT="567E 347A D004 4ADE 55BA 8A5F 199E 2F91 FD43 1D51"
readonly REDHAT_AUXILIARY_FINGERPRINT="43A6 E49C 4A38 F4BE 9ABF 2A53 4568 9C88 2FA6 58E0"
# Location of the key we would like to import (once it's integrity verified)
readonly REDHAT_RELEASE_KEY="/etc/pki/rpm-gpg/RPM-GPG-KEY-redhat-release"

RPM_GPG_DIR_PERMS=$(stat -c %a "$(dirname "$REDHAT_RELEASE_KEY")")

# Verify /etc/pki/rpm-gpg directory permissions are safe
if [ "${RPM_GPG_DIR_PERMS}" -le "755" ]
then
  # If they are safe, try to obtain fingerprints from the key file
  # (to ensure there won't be e.g. CRC error).
  IFS=$'\n' GPG_OUT=($(gpg --with-fingerprint "${REDHAT_RELEASE_KEY}" | grep 'Key fingerprint ='))
  GPG_RESULT=$?
  # No CRC error, safe to proceed
  if [ "${GPG_RESULT}" -eq "0" ]
  then
    tr -s ' ' <<< "${GPG_OUT}" | grep -vE "${REDHAT_RELEASE_2_FINGERPRINT}|${REDHAT_AUXILIARY_FINGERPRINT}" || {
      # If file doesn't contains any keys with unknown fingerprint, import it
      rpm --import "${REDHAT_RELEASE_KEY}"
    }
  fi
fi
...

Example of an ansible remediation role:

---
# - hosts: localhost # set required host
   tasks:
    - name: "Read permission of GPG key directory"
      stat:
        path: /etc/pki/rpm-gpg/
      register: gpg_key_directory_permission
      check_mode: no
      tags:
        - ensure_redhat_gpgkey_installed
        - high
        - CCE-26957-1

    # It should fail if it doesn't find any fingerprints in file - maybe file was not parsed well.
    - name: "Read signatures in GPG key"
      shell: "gpg --with-fingerprint '/etc/pki/rpm-gpg/RPM-GPG-KEY-redhat-release' | grep 'Key fingerprint =' | tr -s ' ' | sed 's;.*= ;;g'"
      changed_when: False
      register: gpg_fingerprints
      check_mode: no
      tags:
        - ensure_redhat_gpgkey_installed
        - high
        - CCE-26957-1

    - name: "Set Fact: Valid fingerprints"
      set_fact:
         gpg_valid_fingerprints: ("567E 347A D004 4ADE 55BA 8A5F 199E 2F91 FD43 1D51" "43A6 E49C 4A38 F4BE 9ABF 2A53 4568 9C88 2FA6 58E0")
      tags:
        - ensure_redhat_gpgkey_installed
        - high
        - CCE-26957-1

    - name: "Import RedHat GPG key"
      rpm_key:
        state: present
        key: /etc/pki/rpm-gpg/RPM-GPG-KEY-redhat-release
      when:
        (gpg_key_directory_permission.stat.mode <= '0755')
        and (( gpg_fingerprints.stdout_lines | difference(gpg_valid_fingerprints)) | length == 0)
        and (gpg_fingerprints.stdout_lines | length > 0)
        and (ansible_distribution == "RedHat")
      tags:
        - ensure_redhat_gpgkey_installed
        - high
        - CCE-26957-1
...

Current statistics, rule coverage


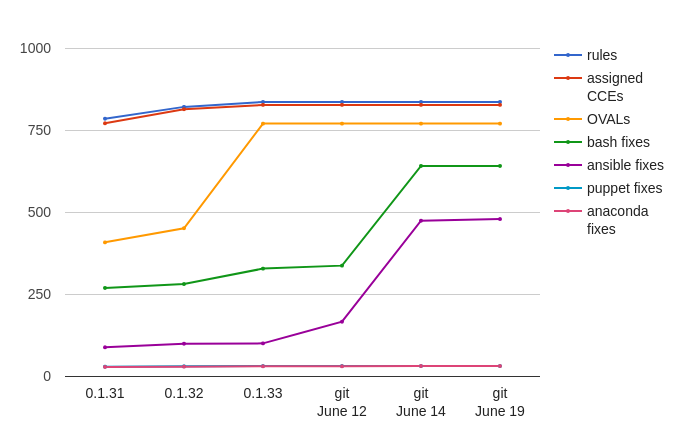
We are working to achieve better Ansible coverage. Our plan is to be on par with bash where possible. Let’s look at our progress.

As you can see we are very close to having Ansible remediations for 500 Red Hat Enterprise Linux 7 compliance rules. Our target is Bash remediation parity – 642 Ansible remediations.

Future plans, request for feedback

At this point we have a working prototype. We would appreciate feedback from Ansible power users. Are we following best practices? Do you see areas for improvements? If you are interested in helping us make Ansible a great tool for security compliance, let us know via our community channels!

Here are a few ansible playbooks generated from SSG commit f50a946a69ed2577f9a3b523a012acdc78a63efa: ssg-rhel7-ansible-examples.zip

Our plan is to iron out all the kinks and start submitting the roles into Ansible Galaxy. That way even users outside the OpenSCAP community will be able to discover them. Let us know what you think!

Contributing to SCAP Security Guide – part 1

When everything is built SCAP Security Guide (or SSG) is a bunch of SCAP files – source datastream, XCCDF, OVAL, OCIL, CPE dictionary and other files. But these files are huge and hard to work on. So developers of SSG split everything up and use a rather complex build system to merge it into bigger files. This helps prevent git conflicts and other nasty problems. The issue is that it also gets harder to figure out what to change if we want to affect the final built file.

In this blog post I will cover where various parts of the XCCDF (also part of the source datastream) come from. We will cover benchmark and rule metadata – title, description, rationale, identifiers and rule remediations – both bash and ansible. So after reading this blog post you will be able to contribute any of those.

Cloning the repository and git flow basics

Go to https://github.com/OpenSCAP/scap-security-guide and click the “Fork” button. This will create your own copy of the upstream repository so that you can make changes to it and suggest the upstream to adopt them using pull requests. After you have your own copy of scap-security-guide, clone it using git.

git clone git@github.com:mpreisler/scap-security-guide.git

Replace the username with your own. At this point I recommend keeping the “origin” remote pointing to your fork and setting up an “upstream” remote so that you can easily pull latest changes other developers integrated.

cd scap-security-guide
git remote add upstream https://github.com/OpenSCAP/scap-security-guide.git

Let’s say I want to work on an amazing new feature. First I’d go to the master branch and make sure it’s in sync with upstream.

git checkout master
git pull upstream master --ff-only
git push origin master # push latest upstream to your fork not necessary but helps if you develop on multiple machines
git checkout -b new_feature
# do all the changes
git push origin new_feature

Now go to https://github.com/OpenSCAP/scap-security-guide and click “New pull request”, use the new_feature branch.

If you there are conflicts you need to resolve them. Here is how:

# we are in the new_feature branch
git checkout master
git pull upstream master --ff-only
git push origin master # push latest upstream to your fork not necessary but helps if you develop on multiple machines
# go back to new_feature branch
git checkout new_feature
git rebase -i master # this is the most important step, base our new_feature branch on latest upstream master instead of the original commit where we branched
git push --force origin new_feature # push force the rebased branch to our fork
# the pull request will update automatically

Build process overview

There are many intermediate steps before the final source datastream is built. Let’s only focus on XCCDF in this blog post, I will cover OVAL and other files in the future.

Separate files -> shorthand XML -> XCCDF 1.1 -> XCCDF 1.2 -> source datastream

When contributing we only change the separate source files. Changing anything in the “output” directory is futile, the changes will be overwritten.

After you have made the changes run:

make -j 4

You can run this command either from the root directory of the git repository, or you can go to the product’s directory and run it there. Running it from root dir will build all products, running it from the product’s directory will only build that product.

To test your changes go to RHEL/7/output and use ssg-rhel7-ds.xml for evaluation / testing.

Benchmark title, description, intro guidance

Let’s walk through the XCCDF file from the beginning to the end.

The Benchmark is the root element and its data come first in the XCCDF. Since the introductory text is mostly the same for various OSes it is shared between multiple products.

To change the title, description, front-matter, rear-matter go to shared/xccdf/shared_guide.xml.

If you want to change the introductory text and disclaimers go to shared/xccdf/intro and choose either shared_intro_app.xml or shared_intro_os.xml depending on the type of the product you want to affect. OS affects RHEL6, 7, … App affects JRE, Chromium, … The contents of the files should be pretty self-explanatory, it is the XCCDF format without namespaces and a few other formalities that are added automatically during the build.

Rule metadata

It gets a bit more complicated with rules. Some are shared and some aren’t so first we need to figure out where the rule we need to change is coming from. I will use RHEL7 and the ensure_gpgcheck_repo_metadata rule ID as an example.

First we need to figure out which group the rule belongs to. You can do this using vim or another text editor but it’s much simpler to use SCAP Workbench.

scap-workbench ssg-rhel7-xccdf.xml

Choose any profile and click Customize. Use the search box to search for the rule ID. We can see that the parent XCCDF Group is “updating”, its parent group is “software”, its parent group is “system” and that is a top level group. So here is how the hierarchy goes:

system/software/updating/ensure_gpgcheck_repo_metadata

Now let’s go to RHEL/7/input and open guide.xslt. We will see a line like this:

 &lt;xsl:apply-templates select="document(concat($SHARED_RP, '/xccdf/system/system.xml'))" /&gt;

This tells us that the entire system group is shared. Let’s go to shared/xccdf/system. In that directory we see a “software” subdirectory and inside it is finally the “updating.xml” that represents the “updating” Group. After we open it we finally see where Rule title, description, identifiers and other metadata are coming from.

When changing these, keep in mind that they are using in other products, not just the one you are testing.

Remediations

The situation was simple with Benchmark, a little more complex with Rule and with remediations, you guessed it, it’s going to get even more complicated 🙂

Remediations can be “static”, typically specific to just one rule and product or they can be generated from templates and the template then applies to multiple rules and sometimes even multiple products.

Let’s keep using our ensure_redhat_gpgkey_installed example from RHEL7. We can see that in the XCCDF there is a bash remediation in the <fix> element. So where is this coming from? Answering that is quite difficult and even though you can deduce it from the build system I recommend using “find” or “grep” to do it because that’s going to be simpler most of the times.

$ find . | grep ensure_redhat
./shared/templates/static/bash/ensure_redhat_gpgkey_installed.sh
./shared/oval/ensure_redhat_gpgkey_installed.xml

And if we go to ./shared/templates/static/bash/ensure_redhat_gpgkey_installed.sh and look at the file it is indeed the source of the remediation. This bash remediation file is just a normal bash snippet with one exception: the # platform line. Depending on its value it is or isn’t included in various products. This one says multi_platform_rhel which means it will get included in all the versions of RHEL. Check out the “shared/modules/map_product_module.py” file for all the possible values.

In this example the remediation is not templated even though it is in the “templates” directory. That is very confusing and we most likely will change that in the future.

Different example – Ansible remediations

The rule we just looked at doesn’t have an Ansible remediation yet. Let us look at another example to explore how ansible remediations are included. I picked the package_aide_installed rule from RHEL7.

Using the same tricks we will find:

shared/templates/output/bash/package_aide_installed.sh
shared/templates/output/ansible/package_aide_installed.yml

Changing those files will temporarily change the final built XCCDF and SDS but that will not persist and those files are not tracked by git. So where do they come from?

They are generated using shared/templates/create_package_installed.py which uses csv/packages_installed.csv and template_ANSIBLE_package_installed and template_BASH_package_installed.

If we want to alter the remediation the file we need to modify depends on the type of change. If the change applies to all package installed remediations we should change the template_* files. If we need to specialize this remediation we need to remove aide from the csv file and create a new remediation in shared/templates/static/{ansible,bash}. If we need to start building a new remediation for a new package we add that package to the csv file and run the build system from scratch.

How are these remediation files used?

Templates are used to build the final remediation snippet, these snippets are then combined using shared/utils/combine-remediations.xml into a huge remediation XML file. This file is used to insert them into the XCCDF.

(contributed by Zbynek Moravec) The prioritization of the various folders is as follows – left = highest priority:

product static > product template > shared static > shared template

Conclusion

I hope this blog post shed some light on the arcane magic of the SCAP Security Guide build system. Let me know in the comment section if something wasn’t clear and what you want to read about in part 2.

Check out the upstream Contribution guide in the meantime: https://github.com/OpenSCAP/scap-security-guide/wiki/Contributing

OpenSCAP XSLT performance improvements for faster SSG builds

As I contribute more and more patches to SCAP Security Guide I got increasingly frustrated with the build speeds. A full SSG build with make -j 4 took 2m21.061s and that’s without any XML validation taking place. I explored a couple of options how I could cut this time significantly. I started by profiling the Makefile and found that a massive amount of time is spent on 2 things.

Generating HTML guides

xslt_optimization_html_guide_chart

We generate a lot of HTML guides as part of SSG builds and we do that over and over for each profile of each product. That’s a lot of HTML guides in total. Generating one HTML guide (namely the RHEL7 PCI-DSS profile from the datastream) took over 3 seconds on my machine. While not a huge number this adds up to a long time with all the guides we are generating. Optimizing HTML guides the first thing I focused on.

I found that we are often selecting huge nodesets over and over instead of reusing them. Fixing this brought the times down roughly 30%. I found a couple other inefficiencies and was able to save an additional 5-10% there. Overall I have optimized it roughly 35-40% in common cases.

During the optimization I have accidentally fixed a pretty jarring bug regarding refine-value and value selectors. We used to select a big nodeset of all cdf:Value elements in the entire document, then select all their cdf:values inside and choose the last based on the selector. This is clearly wrong because we need to select the right cdf:Value with the right ID and then look at only its selectors. Fixing that make the transformation faster as well because the right cdf:Value was already pre-selected.

Old XSLTs:

$ time ../../../shared/utils/build-all-guides.py -j 1 --input ssg-rhel7-ds.xml
real 0m16.736s
user 0m16.349s
sys  0m0.397s

New XSLTs:

$ time ../../../shared/utils/build-all-guides.py -j 1 --input ssg-rhel7-ds.xml
real 0m11.203s
user 0m10.836s
sys  0m0.379s

EDIT: I found more optimization opportunities, latest data as of 2016-08-10:

real 0m3.399s
user 0m2.986s
sys  0m0.409s

I won’t be redoing the entire test-suite and all the graphs but the final savings are much better than it shows in the graph. Generating all RHEL7 SDS guides takes less than 2 seconds on my machine after the optimizations.

Transforming XCCDF 1.1 to 1.2

xslt_optimization_xccdf11_12_chart

It took 30 seconds on my machine to transform RHEL6 XCCDF 1.1 to 1.2. That is just way too much for a simple operation like that. Clearly something was wrong with the XSLT transformation. As soon as I profiled the XSLT using xsltproc --profile I found that we select the entire DOM over and over for every @idref in the tree. That is just silly. I fixed that by using xsl:key and using the very same @idref to element mapping for all lookups. This saved a lot of time.

Doing the RHEL6 XCCDF 1.1 to 1.2 transformation with old XSLTs

real 0m34.635s
user 0m34.585s
sys  0m0.047s

Doing the RHEL6 XCCDF 1.1 to 1.2 transformation with new XSLTs

real 0m0.619s
user 0m0.573s
sys  0m0.045s

The numbers were similar for the RHEL7 XCCDF 1.1 to 1.2 transformation.

Final results for the SSG build

I started with 2m21.061s and my goal was to bring that down to 50%. The final time on my machine after the optimizations with make -j 4 is 1m4.217s. Savings of roughly 55%. Most of those savings are in the XCCDF 1.1 to 1.2 transformation that we do for every product.

The savings are great on my beefy work laptop (i7-5600U) but we should benefit even more from them on our Jenkins slaves that aren’t as powerful. I have yet to test how much they would help there but I estimate it will be 10 minutes for each build.

Correctness

When I suggested to deploy these improvements on our Jenkins slaves, Jan Lieskovsky brought up an important point about correctness. We decided to diff old and new guides and old and new XCCDF 1.2s to be sure we aren’t changing behavior. Please see the attached ZIP file for a test case I created to verify that we haven’t changed behavior. During the process of creating this test case I discovered that I have accidentally fixed a bug mentioned above 🙂 To silence the diffs I have introduced just this bug into the new XSLTs I used. This made the performance slightly worse so keep that in mind when looking at the numbers.

./test_xccdf11_to_12.sh 
Doing the RHEL6 XCCDF 1.1 to 1.2 transformation with old XSLTs

real 0m34.635s
user 0m34.585s
sys  0m0.047s

Doing the RHEL6 XCCDF 1.1 to 1.2 transformation with new XSLTs

real 0m0.619s
user 0m0.573s
sys  0m0.045s

Diffing old_xslt_output/ssg-rhel6-xccdf-1.2.xml and new_xslt_output/ssg-rhel6-xccdf-1.2.xml
The files are the same.


Doing the RHEL7 XCCDF 1.1 to 1.2 transformation with old XSLTs

real 0m33.146s
user 0m33.089s
sys  0m0.050s

Doing the RHEL7 XCCDF 1.1 to 1.2 transformation with new XSLTs

real 0m0.749s
user 0m0.702s
sys  0m0.047s

Diffing old_xslt_output/ssg-rhel7-xccdf-1.2.xml and new_xslt_output/ssg-rhel7-xccdf-1.2.xml
The files are the same.
./test_html_guides.sh 
Doing the RHEL6 and 7 SDS HTML guide transformations with old XSLTs

real 0m39.104s
user 0m38.605s
sys  0m0.491s

Doing the RHEL6 and 7 SDS HTML guide transformations with new XSLTs

real 0m28.974s
user 0m28.531s
sys  0m0.433s

Diffing old_xslt_output/guides_for_diff and new_xslt_output/guides_for_diff
No differences.

UPDATE: Jenkins build times (2016-08-12)

xslt_optimization_ssg_jenkins_build_times
Here is a graph of Jenkins build times, you can see how the build times gradually went lower as optimizations got onto the Jenkins slaves. There are occasional build time spikes caused by load when multiple pull requests were submitted at once but overall the performance has been improved.

Combine SCAP tailoring file and datastream into a single file

Many users customize their SCAP content before use. Usually they use SCAP Workbench. When they are done they end up with the original source datastream and a customization file. If they are scanning using the oscap tool or SCAP Workbench they can use them as they are. If they are however using Red Hat Satellite 6 to do their SCAP scans they cannot upload the 2 files to form a single policy. Instead they need to somehow combine the tailoring and datastream to get a single file. In this blog post we will explore how to do just that.

Option 1: Manual surgery (not recommended)

The first option is to take the Profile from the tailoring file and insert it into the XCCDF Benchmark. Let us see how the tailoring file looks like:

<?xml version="1.0" encoding="UTF-8"?>
<xccdf:Tailoring xmlns:xccdf="http://checklists.nist.gov/xccdf/1.2" id="xccdf_scap-workbench_tailoring_default">
  <xccdf:benchmark href="/usr/share/xml/scap/ssg/content/ssg-fedora-ds.xml"/>
  <xccdf:version time="2016-05-26T14:15:02">1</xccdf:version>
  <xccdf:Profile id="xccdf_org.ssgproject.content_profile_common_customized" extends="xccdf_org.ssgproject.content_profile_common">
    <xccdf:title xmlns:xhtml="http://www.w3.org/1999/xhtml" xml:lang="en-US">Common Profile for General-Purpose Fedora Systems [CUSTOMIZED]</xccdf:title>
    <xccdf:description xmlns:xhtml="http://www.w3.org/1999/xhtml" xml:lang="en-US">This profile contains items common to general-purpose Fedora installations.</xccdf:description>
    <xccdf:select idref="xccdf_org.ssgproject.content_rule_package_aide_installed" selected="true"/>
  </xccdf:Profile>
</xccdf:Tailoring>

In the example above I have created a really small tailoring file which selects one extra rule in the Fedora common profile from SCAP Security Guide. The most important part of the tailoring file are the Profiles. In our example it’s just the one xccdf_org.ssgproject.content_profile_common_customized profile. Let us copy the entire <xccdf:Profile> element into the clipboard.

If we look at a source datastream file things get a lot more complicated. There are catalogs, checklists, checks, extended components and all sorts of other things. Let us assume that our datastream only contains one XCCDF Benchmark. We first need to find it. Look for the <xccdf:Benchmark> element. Keep in mind that the XML namespace prefixes may differ depending on where you got the content.

<ds:component id="scap_org.open-scap_comp_ssg-fedora-xccdf-1.2.xml" timestamp="2016-05-10T14:08:41"><Benchmark xmlns="http://checklists.nist.gov/xccdf/1.2" id="xccdf_org.ssgproject.content_benchmark_FEDORA" resolved="1" xml:lang="en-US" style="SCAP_1.2">
  <status date="2016-05-10">draft</status>
  <title xml:lang="en-US">Guide to the Secure Configuration of Fedora</title>
  <description xml:lang="en-US">This guide presents a catalog of security-relevant configuration
settings for Fedora operating system formatted in the eXtensible Configuration
Checklist Description Format (XCCDF).
<html:br xmlns:html="http://www.w3.org/1999/xhtml"/>
Providing system administrators with such guidance informs them how to securely
configure systems under their control in a variety of network roles.  Policy

OK, so we have found the Benchmark!  That’s the hardest part of this whole operation. We now need to find a good place to insert the Profile element. I like to insert tailored profiles as the last Profile in the benchmark. This ensures that the profiles they are derived from come first.

    <refine-value idref="xccdf_org.ssgproject.content_value_var_accounts_password_warn_age_login_defs" selector="7"/>
    <refine-value idref="xccdf_org.ssgproject.content_value_var_auditd_num_logs" selector="5"/>
    <refine-value idref="xccdf_org.ssgproject.content_value_sshd_idle_timeout_value" selector="5_minutes"/>
  </Profile>
  ... INSERT HERE ...
  <Group id="xccdf_org.ssgproject.content_group_intro">
    <title xml:lang="en-US">Introduction</title>
    <description xml:lang="en-US">

Insert the Profile, make sure you add the namespace declaration if necessary, save the file and we are done! We can now upload this file to Satellite 6 and use our customized profile.

Option 2: Use a script

I have written a small Python helper script that does this entire surgical operation for you. Check it out at https://github.com/mpreisler/combine-tailoring.

Usage:

./combine-tailoring.py ssg-fedora-ds.xml ssg-fedora-ds-tailoring.xml --output o.xml

It is a quick and dirty script, pull requests welcome.

The resulting file can be used in Satellite 6 and the customized profile will show up.

customized_profile

atomic scan and openscap-daemon

I would like to thank Brent Baude, Zbynek Moravec, Simon Lukasik, Dan Walsh and others who contributed to this feature!

Introduction

Containers are a very big topic today, almost all businesses are looking into deploying their future services using containers. At the same time, container technology is transitioning from being a developer toy tool to something that businesses rely on. That means that container users are now focusing on security and reliability.

In this blog post we will discuss a new security related feature in Project Atomic that allows users to check whether their containers have known vulnerabilities. This allows the users to catch and replace containers that have vulnerabilities and thus prevent exploits.

Motivation

Vulnerabilities are potentially a very costly problem for production deployments — internal or customer data leaks, fraud, … The bigger the deployment with more different containers images being used the tougher it gets to track vulnerabilities. Having a tool that can scan all containers we have deployed for vulnerabilities without affecting services would clearly help a lot.

Installation

We will need:

There are two major setups that we will discuss.

Everything on the same host (simple)

atomic_scan_host

We could install all 3 parts on the host computer and then scan containers that are on that computer.

# assuming Fedora 23
dnf install atomic
dnf install openscap-daemon

systemctl enable openscap-daemon
systemctl start openscap-daemon


OpenSCAP in SPC (preferred)

atomic_scan_spc

We could install Atomic on the host computer, then install a super-privileged container with openscap-daemon, openscap and Atomic inside. The host Atomic will request the SPC to scan containers on the host machine.

This arrangement seems more tricky and complex but in the end is easier to manage because we can just pull the latest version of the SPC to install and/or update.

# assuming Fedora 23 and a self-built SPC
dnf install atomic
git clone https://github.com/OpenSCAP/openscap-daemon.git
cd openscap-daemon/atomic
docker build f23_spc
# replace ID with the final ID that `docker build` gives you
atomic install $ID
atomic run $ID
# assuming Fedora 23 and a pre-built SPC
# TODO

Usage

OK, now we have all the bits we need. Let’s use them.

# scanning a single container
atomic scan $ID
# scanning a single container image
atomic scan $ID
# scanning all images and all containers
atomic scan --all

Example output:

$ atomic scan 82ad5fa11820

Scanning...

Container/Image   Cri   Imp   Med   Low  
---------------   ---   ---   ---   ---  
82ad5fa11820      1     2     7     2  
$ atomic scan --detail 82ad5fa11820

Scanning...

82ad5fa11820
OS : Red Hat Enterprise Linux Server release 7.1 (Maipo)
Critical : 1
CVE : RHSA-2015:1981: nss, nss-util, and nspr security update (Critical)
CVE URL : https://access.redhat.com/security/cve/CVE-2015-7181
RHSA ID : RHSA-2015:1981-00
RHSA URL : https://rhn.redhat.com/errata/RHSA-2015-1981.html

Important : 2
CVE : RHSA-2015:2172: glibc security update (Important)
CVE URL : https://access.redhat.com/security/cve/CVE-2015-5277
RHSA ID : RHSA-2015:2172-00
RHSA URL : https://rhn.redhat.com/errata/RHSA-2015-2172.html

CVE : RHSA-2015:1840: openldap security update (Important)
CVE URL : https://access.redhat.com/security/cve/CVE-2015-6908
RHSA ID : RHSA-2015:1840-00
RHSA URL : https://rhn.redhat.com/errata/RHSA-2015-1840.html

Moderate : 7
CVE : RHSA-2015:2199: glibc security, bug fix, and enhancement update (Moderate)
CVE URL : https://access.redhat.com/security/cve/CVE-2013-7423
RHSA ID : RHSA-2015:2199-00
RHSA URL : https://rhn.redhat.com/errata/RHSA-2015-2199.html

CVE : RHSA-2015:2159: curl security, bug fix, and enhancement update (Moderate)
CVE URL : https://access.redhat.com/security/cve/CVE-2014-3613
RHSA ID : RHSA-2015:2159-00
RHSA URL : https://rhn.redhat.com/errata/RHSA-2015-2159.html

CVE : RHSA-2015:2155: file security and bug fix update (Moderate)
CVE URL : https://access.redhat.com/security/cve/CVE-2014-0207
RHSA ID : RHSA-2015:2155-00
RHSA URL : https://rhn.redhat.com/errata/RHSA-2015-2155.html

CVE : RHSA-2015:2154: krb5 security, bug fix, and enhancement update (Moderate)
CVE URL : https://access.redhat.com/security/cve/CVE-2014-5355
RHSA ID : RHSA-2015:2154-00
RHSA URL : https://rhn.redhat.com/errata/RHSA-2015-2154.html

CVE : RHSA-2015:2131: openldap security, bug fix, and enhancement update (Moderate)
CVE URL : https://access.redhat.com/security/cve/CVE-2015-3276
RHSA ID : RHSA-2015:2131-00
RHSA URL : https://rhn.redhat.com/errata/RHSA-2015-2131.html

CVE : RHSA-2015:2108: cpio security and bug fix update (Moderate)
CVE URL : https://access.redhat.com/security/cve/CVE-2014-9112
RHSA ID : RHSA-2015:2108-00
RHSA URL : https://rhn.redhat.com/errata/RHSA-2015-2108.html

CVE : RHSA-2015:2101: python security, bug fix, and enhancement update (Moderate)
CVE URL : https://access.redhat.com/security/cve/CVE-2013-1752
RHSA ID : RHSA-2015:2101-00
RHSA URL : https://rhn.redhat.com/errata/RHSA-2015-2101.html

Low : 2
CVE : RHSA-2015:2140: libssh2 security and bug fix update (Low)
CVE URL : https://access.redhat.com/security/cve/CVE-2015-1782
RHSA ID : RHSA-2015:2140-00
RHSA URL : https://rhn.redhat.com/errata/RHSA-2015-2140.html

CVE : RHSA-2015:2111: grep security and bug fix update (Low)
CVE URL : https://access.redhat.com/security/cve/CVE-2015-1345
RHSA ID : RHSA-2015:2111-00
RHSA URL : https://rhn.redhat.com/errata/RHSA-2015-2111.html

Future

We are working to get all of those parts packaged and then publish the ready-made SPC. In the future `atomic scan` may even pull it automatically so no installation other than Atomic should be required.

Further reading